|
SPAOP
|


All Classes Namespaces Files Functions Variables Typedefs Enumerations Enumerator Friends Macros Pages
|
SPAOP
|
Although (hopefully) most things should be self-explanatory if you're used to working with both the WONDER system and audio-plugins, here are a few words on how to use SPAOP and the StreamMulticaster.
There are two different contexts in which the SPAOP plugin may be used: either connected to a WONDER system ("Linked to WONDER" mode) or on its own, without being connected to WONDER ("Standalone" mode).
When operating SPAOP in connection with WONDER, you need to do the following steps:
Note that currently, all network settings are fixed at compiletime, so your SPAOP-plugin must be compiled for the WONDER setup you want to use.
Also, there is a known bug that will make xWONDER act weird when it is started after SPAOP and the StreamMulticaster, so try to avoid that (and don't be surprised in case that happens).
Standalone mode allows you to edit your project (parameter automations) etc even when you're not connected to WONDER. Of course, no wave field synthesis will happen in that case, but you can prepare your project for subsequent use with WONDER. All you need to do for that is:
Please note that the following explanations were written for the v0.8 release of SPAOP. If you built SPAOP from the latest version of the source code, you might notice a few changes in the GUI design - but apart from a few buttons being moved, the folowing still applies.
Let's have a quick look at the GUI of the Plugin:
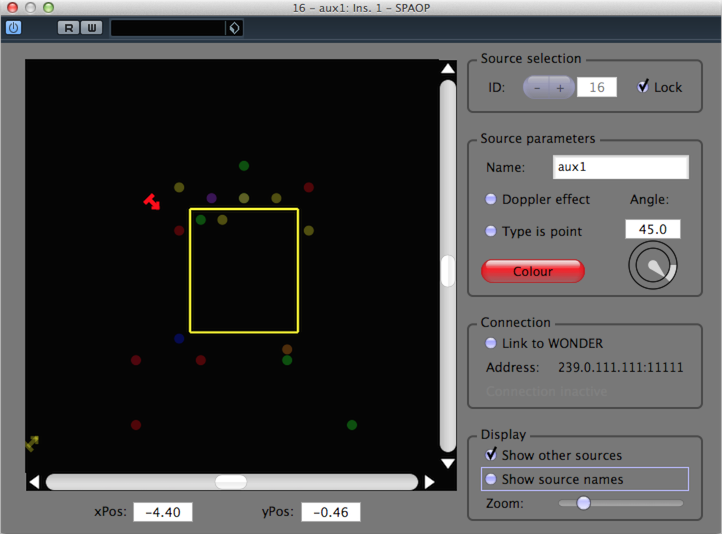
On the left, there is the two-dimensional panel from where you can control the source's position. Note that with each SPAOP instance, you can only control one source. On the right, there are four sections which shall be explained in top-to-bottom order:
Here you must choose the WONDER-specific source-ID. Every SPAOP-instance should be associated with a different source-ID. You must confirm your choice by checking the "Lock" checkbox. If you do not "lock" the source-ID, no OSC messages will be sent and the plugin will stay inactive.
This is where you set all parameters of the source (besides its position).
Here you can toggle between Linked to WONDER and Standalone modes. Also, the destination address where the outgoing OSC-messages are sent is displayed. When connected to WONDER, you will also see information on the connection status.
The display settings allow you to control what is being displayed in the panel on the left side. You can control whether the other sources (not controlled by the current SPAOP instance) shall be displayed and whether the names of the sources shall be shown. Also, you can use a slider to zoom in or out.
There's not much to explain about the StreamMulticaster. Just start it from the command line. To stop it, press enter.
 1.8.6
1.8.6